Does it seem difficult to repot the dracaena plant? It may seem like that but repotting the dracaena plant is not as tricky as you thought.
If you are looking for a plant that is easy to grow and care for, then the dracaena plant is the best choice for growing plants indoors, but you need its repotting care. If you already have this plant at home and it has been in the same pot for longer, it is time to repot it to a new pot.
Luckily, the repotting process of the dracaena plant is easy and gives you one-on-one time with your favorite dracaena plant. Repotting this plant is like repotting any other plant; you only need to choose suitable soil and pot. Here we go into the repotting details of the dracaena plant:
Why Repotting Is Important For Dracaena?
At a specific time, all the dracaena plants need repotting for better growth. There are plenty of reasons why repotting is necessary for the plant:
Growth
The first reason for repotting is the growth of the dracaena plant. The dracaena plants have slower growth indoors than outdoors, but they eventually take up all the free space in the pot when they grow.
When you notice that the roots are starting to circle the bottom of the pot, that time will be the best time to repot your dracaena plant because the plant does not have more space for growth.
Soil Quality
The plants that have slow growth can remain in the same pot for years, but the fast-growing plants cannot remain to grow in the same pot for years. Over time, the plant roots take all the nutrients and valuable materials from the soil, and the soil degrades with time.
The structure of the soil breaks down due to watering the plant. So, changing the pot and soil will be a perfect idea to ensure the better growth of the plant with essential soil nutrients,
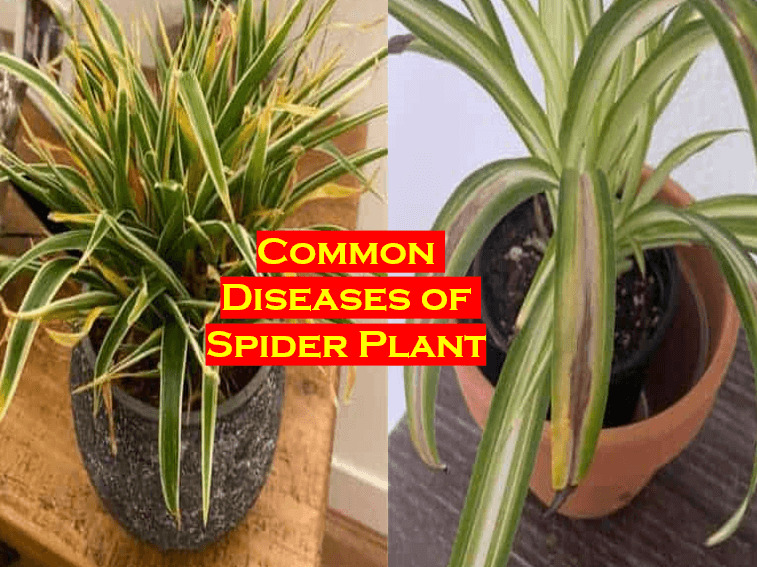
Diseases And Pests
Although everyone protects their plants from pests and diseases, problems sometimes occur. If you notice any pests and diseases in the roots or soil, repotting the plant will be best.
When To Repot Dracaena?
Dracaena plant is also a little sensitive like other plants. They are slow-growing plants, but they need a new pot or container after every 2 or 3 years. There are different reasons for the repotting of the dracaena plant. You must pay attention to your plant about when you should repot it. Some of the situations are as follows when you must consider the repotting:
- Roots grow out of the drainage holes of the pot.
- Roots push up from the surface of the soil.
- You notice slower growth than normal growth.
- When you notice the roots have become tightly meshed.
- Problems occur like rotten roots, mold, or fungus.
If you are wondering what the best time for the dracaena plant to repot is, then early spring will be the best time of the year. Repotting causes shock to the plants, so it would be better for a plant to recover it early as possible to prevent potential damage.
If you are in a hurry to repot, you can do repotting any time of the year. It would be best to repot the dracaena plant than wait for the specific season to prevent the plant from diseases.
Materials Needed For Repotting
Depending on the size of your dracaena plants, it will be better to pre-plan the whole process first. Make sure to grab these tools or materials before starting the repotting process.
- Any covering to cover the floor to avoid soil mess
- Suitable potting soil that can fill the entire new pot
- A new pot with a lot of drainage holes
- Scissors or chopsticks
- If the tree or plant is too large, it would be best to call someone for help
Steps To Repot Dracaena
After collecting all the needed tools, it is time to repot your dracaena plant. Let’s follow the complete procedure carefully that I’m describing below:
Step 1: Water the Plant Before Repotting
When you decide to repot your dracaena plant, then make sure to water the plant one day before the repotting. Do not water it on the day of repotting; it will cause roots to become messy.
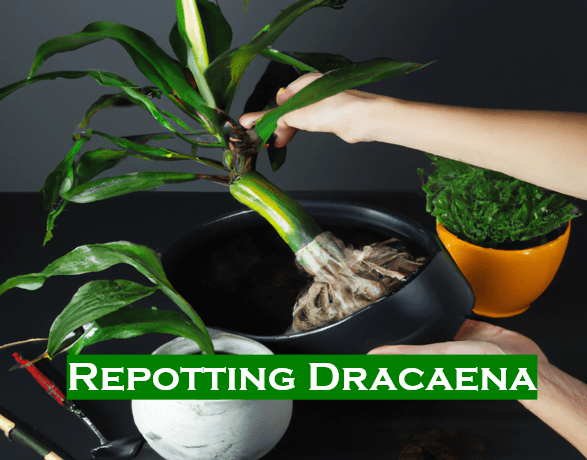
Step 2: Remove the Plant from An Old Pot
Hold the plant’s stem from the base and pull it upward. Make sure to pull it gently without causing harm to the root ball. If the roots are stuck into the soil, use scissors to cut the pot or container sides to pull out the plant completely.
Step 3: Examine the Roots
After removing the plant from the old pot, examine its roots and make sure there must not any black or brown color roots. If there are, it means the roots have any disease or are rotten. Cut the black or brown color roots carefully without harming the root ball and other roots.
Step 4: Repot the Plant
Before placing the plant into the new pot, water the new potting soil slightly to make it a little better for the new plant. After a few minutes, place the dracaena plant into the new pot carefully and start filling the pot with potting soil. Fill the pot until the whole root system is covered in the soil. The root ball must not be too deep from the top of the soil.
Step 5: Placing the Plant in The Right Place
Water the dracaena plant after repotting it successfully and then place it in the bright sunlight, but the light must be filtered or indirect.
Post-Repotting Care of Dracaena
The dracaena plant is a slow-growing plant, so water it immediately after the repotting to make it adjust to the new soil quickly. It will prevent the plant from shock and encourage the roots for efficient growth.
Place the plant in indirect but bright sunlight. If you see any wilting or yellowing of leaves, then don’t worry; it might be due to the new soil. It will come to normal after a few days or weeks.
Do not change your care routine for the dracaena plant. If the color of the leaves does not change even after a month, look for the problem and rectify it.
Conclusion
Repotting the dracaena plant only takes a simple procedure to follow the steps given in the article. Make sure to follow the steps you read in the article to make your plant repotting successful. Don’t overdo things, and ensure that plants don’t undergo stress.
FAQs
Do I Water Dracaena After Repotting?
Yes, you can water the dracaena plant after repotting. But you must wait for the next watering until you see the 1-2 inches of soil dry. The soil will take almost 3 weeks to dry, so it will be better to water the repotted dracaena plant after 3-4 weeks. Never overwater or underwater the plant; the plant may be damaged.
What Kind of Soil Does a Dracaena Need?
Always remember that soil that is well-drained and rich in organic matter and nutrients is best for the dracaena plant. The plant grows and thrives well in its favorite potting soil. Use Miracle-Gro® indoor potting soil that does not contain compost or bark.
How Do You Transplant a Dracaena?
Transplanting your dracaena plant into the new pot takes only a few steps. Grab a bigger pot than the previous one and fill it with rich potting soil. Make a hole in the center of the soil, insert the cutting or plant into the hole, and pat the soil around it. Ensure to water the plant immediately after transplanting and place it in bright but indirect sunlight.